Getting Started with C# - Visual Studio (free)
So you want to code C#? Well I have just the guide for you, here we’ll go through a whole array of things (pun intended). I’ll also link some references so you can read further on those if you get confused. I'll explain how you can get started coding in C#.
In this post we will be going through the full process of getting started coding in C#, we will go over how to make a simple game and all the things you need to know before you start coding.
Installing an IDE (Integrated Development Environment)
An IDE is an environment where we make, code and compile our projects, you’ll need one if you want to be able to run your code! There are tons of different IDEs and you decide which one you would like to use. Personally I use Rider, it’s sleek, modern and feels nice. The main choices you have are:
I would recommend either Visual Studio or Rider. I’ll walk you through the installation of Visual Studio, since it’s the free option.
First off you’ll need to head over to the download page: https://visualstudio.microsoft.com/downloads
Once you’re there you should select the Community version (since it’s free) and hit “Free download”, once it’s downloaded, you head to your downloads folder and open the “vs_community.exe”, the first thing to pop up should be:
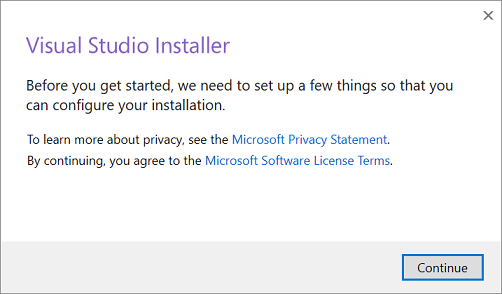
You click continue, this should install the Visual Studio Installer. Once that’s installed, it’ll ask you to select workloads. That should look something like this:
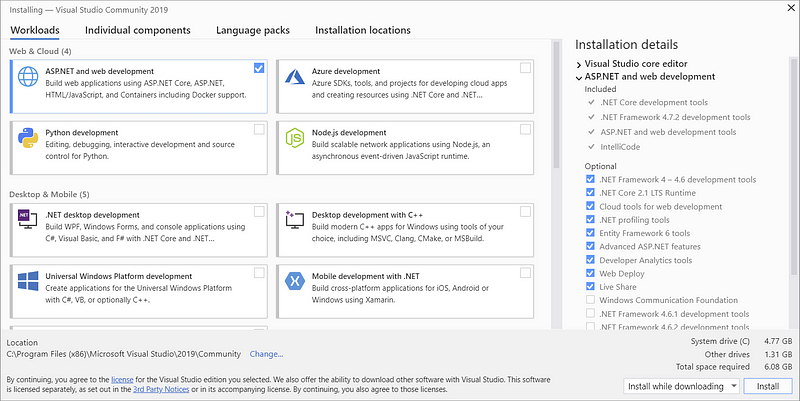
We want to select the “.NET desktop development”, if you want to select other once, feel free to, but the only one we need is “.NET desktop development”. Once you’ve selected that, you can go ahead and hit install in the bottom right corner, this will start the installation. The installation might take some time.
When Visual Studio is installed
When you’ve finally got Visual Studio installed, launch it and you should be met with a page that looks something like this:

You are going to click “Create a new project”. In the next window you’ll be met with a ton of different options to what you can select when making a new project, for this tutorial we’re going to put “console” into our search and click the one that says “Console App (.NET Framework)”. On the next page you’ll select a name for your project, I’ll call mine “HelloWorld”. You can also choose what folder you would like the project to be created in. When you click create, you’ll be met with something like this:
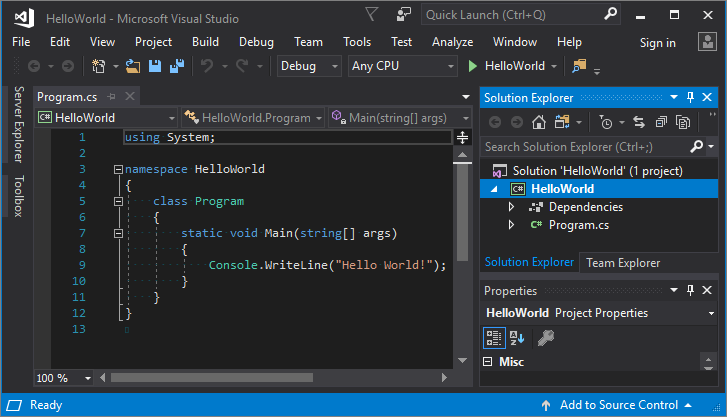
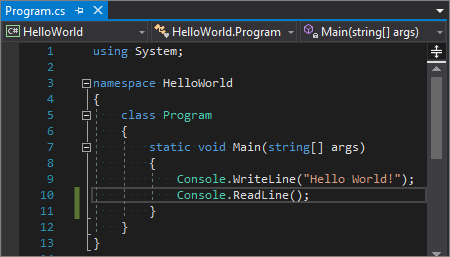
Don’t be alarmed by all the things on the screen, you’ll get used to all of it, our focus is primarily the main “text box”. If you try to run this project, the console window will appear for a second, then disappear, because it finished it’s job. If you want to see the Console for more than a split second, you’ll have to make it wait, we’ll do that by typing Console.ReadLine(); under our Console.WriteLine. It should look like this:
Then you can either click the F5 key on your keyboard or use the start button within Visual Studio to start your program, the start button is located like shown on the image below:

When you run that, your console should look something like this:
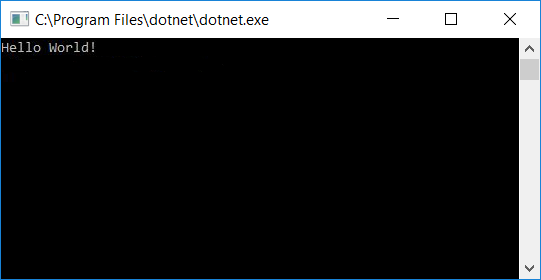
If it does, you’ve successfully built your first application in C#! Now we’ll go over variables, what they are and how they’re used.
Introduction to Variables
Variables are points where you can store data, like a number or a bit of text. There are over a dozen different variable types, but I’ll only go over a few of the ones we might need.
Int — An integer is a whole number, a number with no decimals
Double — An integer that can have decimal points
String — A variable to store text
Bool — A boolean is a value that is either true or false
All of the above are variable types, you’ll initialize each one of them similarly:
int Name = 0; //This initializes an integer with the name “Name” that has a value of 0
double Double = 0.45; //This initializes a double with the name “Double” that has a value of 0.45
string Text = “Sample”; //This initializes a string with the name “Text” that has a value of “Sample”
bool Test = false; //This initializes a bool with the name “Test” that has a value of false
All of the lines above have a semi-colon at the end, that’s important when you’re writing code, you always have to remember to put a semi-colon at the end of each line.
Simple Functions
In this part we’ll go over simple functions like writing to console and reading from console. To write to console, all you have to do is:
Console.WriteLine();
And in the brackets you input what you want to write to the console, remember, if the thing you want to write is text, always put quotations around the text like this:
Console.WriteLine(“Some text I want to write to console”);
If you want to input a variable into the WriteLine, you don’t have to include quotations:
string Text = “Some text I want to write to console”;
Console.WriteLine(Text);
This writes “Some text I want to write to console” into the console, since it’s a variable, no quotations are needed. Let’s go over how you can implement variables and text into the WriteLine. We’ll do this with the plus sign first, then we can input it as a variable inside an Interpolated String.
string Text = “want to write to console”;
Console.WriteLine(“Some text I “ + Text);
This will output “Some text I want to write to console” into the console. Next we’ll go over the same thing but using an Interpolated String, those are denoted by a “$” before the quotation marks, to input a variable, just enclose it in curly/squiggly brackets “{}”:
string Text = “want to write to console”;
Console.WriteLine($”Some text I {Text}”);
This will output “Some text I want to write to console” into the console. Up next is reading the input of the user. To do this, you usually want to store the input in a variable, to do that you just initialize the variable with the value of Console.ReadLine();, like this:
string Input = Console.ReadLine();
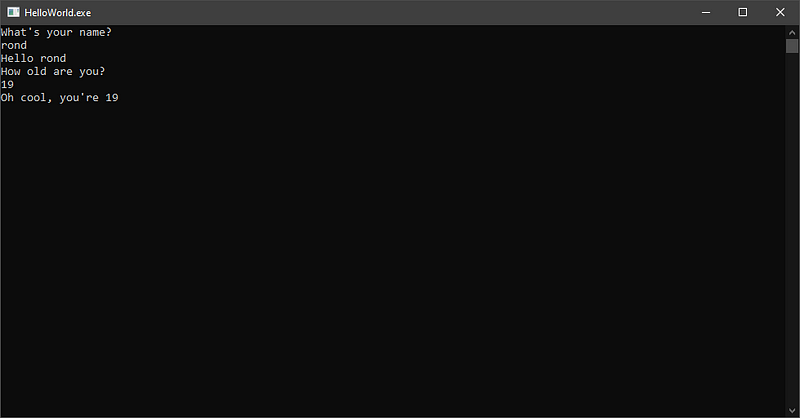
Now the input of the user is stored inside the “Input” string. Let’s try an example where we ask for their name and then write hello back to them:
Console.WriteLine(“What’s your name? “);
string Name = Console.ReadLine();
Console.WriteLine($”Hello {Name}”);
This little snippet of code writes “What’s your name?” and waits for the users input, once the user has input their name, it will say hello to them accompanied by their name 😃 Great, so far you’ve learnt what variables are and some types of variables, and you’ve learnt how to use variables inside a string. You’ve also learn how to say Hello 👋 to a user when they input their name. Great job! 😄
Code Structure
Let’s learn what all that stuff was within Visual Studio, let’s learn what each thing does.
First I’ll explain everything within the “Code” window:
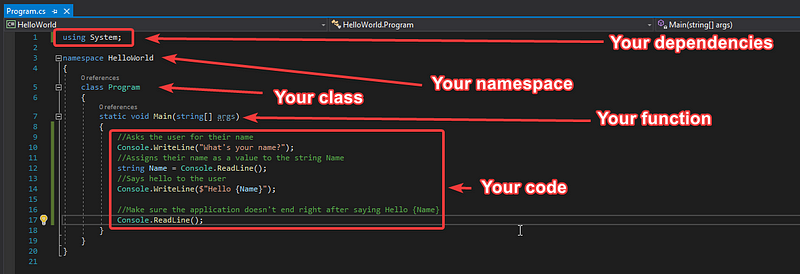
Your dependencies is what you have to include into the project, for example an external library or a dependency you need for a specific function, for example if you were to use “RandomNumberGenerator” then visual studio would have you import “System.Security.Cryptography”.
Your namespace is the space of which your code lives in, everything in this namespace is accessible to you (except if it’s a private function, but I’ll get into that later). This usually stays the same across all your classes in the project.
Your class is like a blueprint for creating objects, you can’t have a function outside of a class, you’ll always have them inside the curly brackets of the class.
Your function is well a function, it does something (functions) the way you code it to, in the example here, the “Main” function asks for your name and says hello. You can have multiple functions inside a program, you can even call a function from another function (we’ll get into this later down the road).
Your code is, well, your code, it’s the thing that gets executed when you click Start.
Outside of the “Code” window and to the right, you’ll have Solution Explorer and properties:
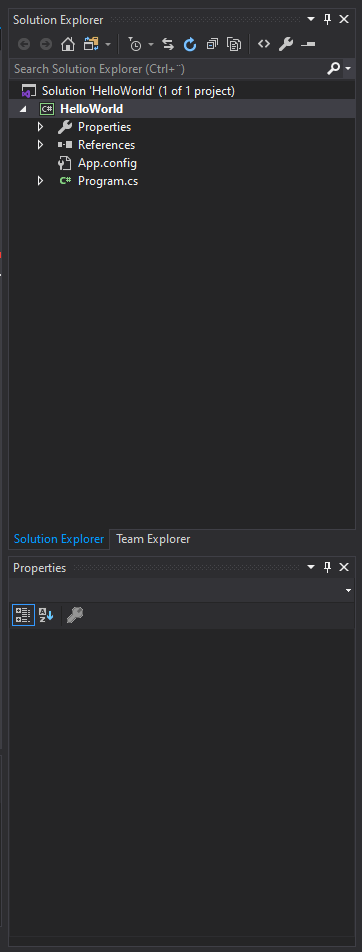
The solution explorer is where you access all the files in your project, it’s also where you’ll create new classes and change properties of the project. The properties window only matters if you are making a forms application (which we aren’t in this guide, maybe another time).
At the top you have TONS of selections and menus, these I’ll let you explore more for yourself, so I don’t waste your time explaining all the different functions of the different menus and selections, all you’ll need to know for now is where your start button is, which we went over in the “When Visual Studio is Installed” part of the guide.
Making new functions
To make a new function, you’ll have to go outside the one your in and type like this, where Age is the name of your function:
static void Age()
{
}
Now your code should look something like this:

If you noticed the green lines of text, I’ll explain them: they’re comments, they let you comment stuff, pretty cool huh? 😎
Inside this function we’ll ask for the user’s age. We’ll do it like this:
Console.WriteLine(“How old are you? ”);
int Age = Convert.ToInt32(Console.ReadLine());
Console.WriteLine($“Oh cool, you’re {Age}“);
You probably noticed the “Conver.ToInt32”, this is because Console.ReadLine() gives you a string, but age is a number, so we’ll have to convert that. Currently, our function is never accessed, but we’ll change that by adding Age(); to our main function. You’ll do this before the Console.ReadLine(); at the end, like so:

Then, when we run the application, this is what it should look like:
Cool, we now referenced a function within a function. 😎 Next we’ll go over how to do it from a whole different class.
Using multiple classes
Using multiple classes is the common practice to get nice looking code, you don’t want it looking like spaghetti. Examples of this is when you need to call a function multiple times, but you don’t want to write the whole function out each time, and you probably use it in a few different classes. You can then create a class called Utilities.cs and put the function in there, and it’ll be easy to reference it from wherever you need to.
We’ll create a new class to ask for a hobby. I’ll name mine Hobby.cs, you create a new class by right-clicking your solution, my solution is called “HelloWorld”, so I right-click HelloWorld, and select “Add”, then “New item”, like this:
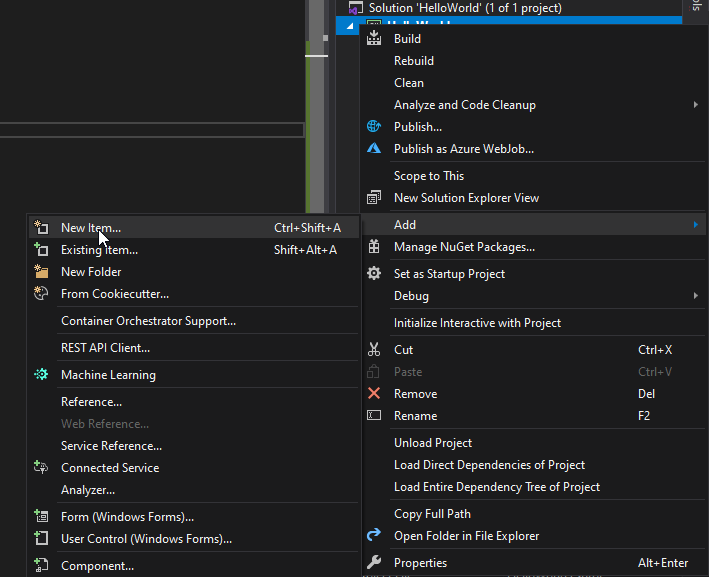
You’ll then get a popup with tons of confusing choices, but it’s already set to what we need — Class — so we’ll just chose the name at the bottom and click add:

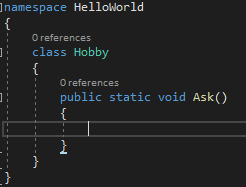
Now you’ll be taken into a completely empty class, so we’ll have to make a function within that, I hope you remember how we did that 😏
I’ll call my function Ask, and it looks like so:
For the sharp-eyed of you, you might of noticed that I added “public” in front of the static void, that’s because it’s going to be accessible to other classes as well. There’s different types you can set in-front of your definitions, some of those are:
- public — makes it accessible to everything
- private — makes it accessible to that class or struct
- protected — makes it accessible to that class, or in a class that is derived from that class
- internal — makes it accessible to any code in the same assembly
That’s just a few of the Access Modifiers that you can put, but we will really only be touching on public and private.
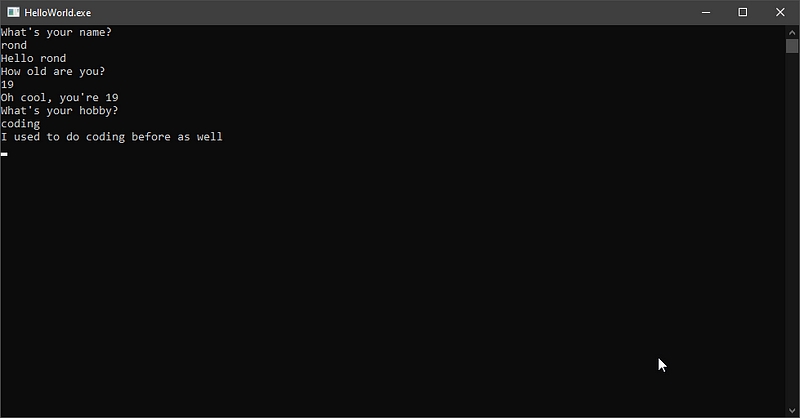
So inside ask, you’ll ask for their hobby, I am confident you can do this on your own. Then we reference it within the Program.cs.
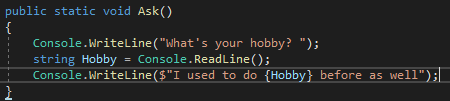
If you couldn’t do it on your own, here’s the code I made to ask for their hobby:
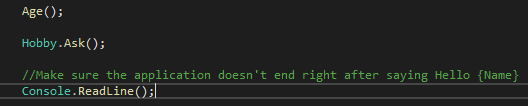
And we reference it within the Program.cs like this:
Then the program should show output like:
Making a small game
In the next part we’ll make a small game to show how if statements work, we’re only going to make a simple game, it’s not gonna be anything advanced. What I’m thinking we should do are yes/no selections, since those are fairly easy to make if statements with. Let’s get started.
To make an if statement, all you have to do is put your statement in parentheses after if, like this:
Console.WriteLine(“Would you like to enable pirate speak?”);
string Selection = Console.ReadLine();
if(Selection.ToLower() == “yes”)
{
Console.WriteLine($“So ye wants t’ be a pirate, {Name}?”);
}
If the user then inputs YES, Yes or yes, it will respond with “So ye wants t’ be a pirate?”, We do “.ToLower()” to make it lowercase so it’ll be easier to check if the answer is yes, if we didn’t do this, “Yes” would not make it say “So ye wants t’ be a pirate?”. And we previously got the Name variable! So the code and application should look like this:

Wow I learned so much 😱
ReplyDeleteAmazing guide!
No problem! Glad it helped :)
Delete